OpenCV-python:基础
18年结束毕业设计之后,对OpenCV接触很少了。那时使用的是C++,借由最近使用python较多,学习OpenCV-python算是一种温故。本文主要参考了OpenCV-Python图像处理教程 以及官方文档 。
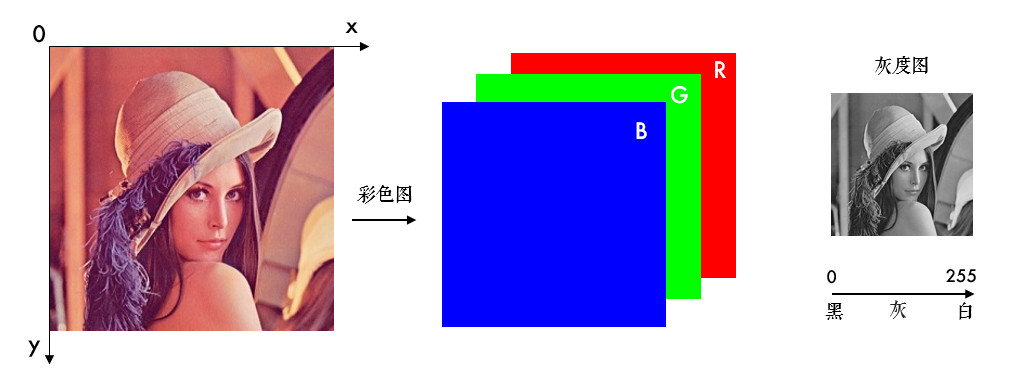
一、图片#
需要注意图片的x,y轴排布,三通道以B-G-R排布,灰度图只有一个通道。
1.1 读取#
# 加载灰度图
img = cv2.imread('lena.jpg', 0)
- 参数1:图片的文件名
- 如果图片放在当前文件夹下,直接写文件名就行了,如’lena.jpg’
- 否则需要给出绝对路径,如’D:\OpenCVSamples\lena.jpg’
- 参数2:读入方式,省略即采用默认值
cv2.IMREAD_COLOR:彩色图,默认值(1)cv2.IMREAD_GRAYSCALE:灰度图(0)cv2.IMREAD_UNCHANGED:包含透明通道的彩色图(-1)
1.2 显示#
# 创建窗口
cv2.namedWindow('lena2', cv2.WINDOW_NORMAL)
- 参数1:窗口名称
- 参数2:窗口模式
cv2.WINDOW_AUTOSIZE表示窗口大小自适应图片cv2.WINDOW_NORMAL表示窗口大小可调整
# 显示图片
cv2.imshow('lena', img)
- 参数1:窗口名称
- 参数2:图片实例
# 保持图片显示
cv2.waitKey(0)
-
参数:暂停时长,ms
为0时,表示无限长。
-
传回按键的ascii码, 如
ESC:27、s:115
1.3 保存#
# 保存图片
cv2.imwrite('lena_gray.jpg', img)
- 参数1:是包含后缀名的文件名
if cv2.waitKey(10000) == 115:
    cv2.imwrite('lena_gray.jpg', img)
- 显示10秒,当按下
s时,保存图片
if cv2.waitKey(10000) == ord('q'):
    cv2.imwrite('lena_gray.jpg', img)
- 也可以用
ord(),按下q时,保存。
1.4 处理#
OpenCV中很多简单的操作实际上是NumPy的操作,请参照第四篇 。
1. 像素
px = img[y, x]
- 先输入行,再输入列
- 对于彩色图像会返回依次为B-G-R三个通道的值组成的列表,例如
[100, 110, 120] - 对于灰度图或者单通道图,只有一个值。例如
100
px_blue = img[y, x, 0]
px_green = img[y, x, 1]
px_red = img[y, x, 2]
- 获取单通道值
2. 属性
(1)形状
# 彩色图像,返回一个包含行数(高度)、列数(宽度)和通道数的元组
height, width, channels = img.shape
# 灰度图,返回行数和列数的元组
height, width = img.shape
(2)数据类型
img.dtype
实际上img.dtype现实的是图像的深度depth,C++中type包含图像深度depth(低三位)和通道数channel(高三位)。channel可以是1,2,3,n。depth有以下可选:
// <interface.h>
#define CV_8U   0
#define CV_8S   1
#define CV_16U  2
#define CV_16S  3
#define CV_32S  4
#define CV_32F  5
#define CV_64F  6
#define CV_16F  7
- 数字表示一个像素占几位内存,
U表示unsigned,S表示signed,F表示float
(3)ROI (Region of Interest)
# 截取ROI
roi = img[100:200, 200:300]
- 直接指定范围即可,上面表示行数为
100-200,列数为200-300的区域
(4)通道分割和合并
# 分割
b, g, r = cv2.split(img)
# 合并
img = cv2.merge((b, g, r))
split()函数比较耗时,更高效的方式是用numpy中的索引,如提取B通道:
b = img[:, :, 0]
(5)颜色空间转换
# 转换图片类型
cv2.cvtColor(frame, cv2.COLOR_BGR2GRAY)
- 参数2:cv2.cvtColor()
- 颜色转换其实是数学运算,如灰度化最常用的是:
gray=R*0.299+G*0.587+B*0.114
3. 几何变换
(1)缩放
# 按照指定的宽度、高度缩放图片
res = cv2.resize(img, (132, 150))
- 参数2:顺序是宽度,高度;并非
.shape中高度,宽度,通道的顺序
# 按照比例缩放,如x,y轴均放大一倍
res2 = cv2.resize(img, None, fx=2, fy=2, interpolation=cv2.INTER_LINEAR)
interpolation,插值方法,默认是INTER_LINEAR,InterpolationFlags :
| Enumerator | |
|---|---|
| INTER_NEAREST Python: cv.INTER_NEAREST | nearest neighbor interpolation |
| INTER_LINEAR Python: cv.INTER_LINEAR | bilinear interpolation |
| INTER_CUBIC Python: cv.INTER_CUBIC | bicubic interpolation |
| INTER_AREA Python: cv.INTER_AREA | resampling using pixel area relation. It may be a preferred method for image decimation, as it gives moire’-free results. But when the image is zoomed, it is similar to the INTER_NEAREST method. |
| INTER_LANCZOS4 Python: cv.INTER_LANCZOS4 | Lanczos interpolation over 8x8 neighborhood |
| INTER_LINEAR_EXACT Python: cv.INTER_LINEAR_EXACT | Bit exact bilinear interpolation |
| INTER_MAX Python: cv.INTER_MAX | mask for interpolation codes |
| WARP_FILL_OUTLIERS Python: cv.WARP_FILL_OUTLIERS | flag, fills all of the destination image pixels. If some of them correspond to outliers in the source image, they are set to zero |
| WARP_INVERSE_MAP Python: cv.WARP_INVERSE_MAP | flag, inverse transformationFor example, linearPolar or logPolar transforms:flag is not set: dst(ρ,ϕ)=src(x,y)flag is set: |
(2)翻转
dst = cv2.flip(img, 1)
- 参数2 = 0:垂直翻转(沿x轴),参数2 > 0: 水平翻转(沿y轴),参数2 < 0: 水平垂直翻转。
(3)平移
# 平移图片
import numpy as np

rows, cols = img.shape[:2]

# 定义平移矩阵,需要是numpy的float32类型
# x轴平移100,y轴平移50
M = np.float32([[1, 0, 100], [0, 1, 50]])
# 用仿射变换实现平移
dst = cv2.warpAffine(img, M, (cols, rows))

cv2.imshow('shift', dst)
cv2.waitKey(0)
M实际上是仿射矩阵 去除了最后一行,由矩阵A和向量b组成,由于只做平移,A = [[1, 0], [0, 1]]
(4)旋转
平移相当于旋转的一种特例,但是由于仿射变换比较复杂,一般直接找很难找到这个矩阵,OpenCV提供了根据变换前后三个点的对应关系来自动求解,M=cv2.getAffineTransform(pos1,pos2),其中两个位置就是变换前后的对应位置关系。输出的就是仿射矩阵M。然后再使用函数cv2.warpAffine()。
from matplotlib import pyplot as plt
import cv2
import numpy as np

img = cv2.imread('aier.jpg')
rows,cols = img.shape[:2]
pts1 = np.float32([[50,50],[200,50],[50,200]])
pts2 = np.float32([[10,100],[200,20],[100,250]])
M = cv2.getAffineTransform(pts1,pts2)
#第三个参数:变换后的图像大小
res = cv2.warpAffine(img,M,(rows,cols))
plt.subplot(121)
plt.imshow(img[:,:,::-1])

plt.subplot(122)
plt.imshow(res[:,:,::-1])

plt.show()
如果仅作旋转和缩放,可以使用 cv2.getRotationMatrix2D()函数来生成这个矩阵,该函数有三个参数:
- 参数1:图片的旋转中心
- 参数2:旋转角度(正:逆时针,负:顺时针)
- 参数3:缩放比例,0.5表示缩小一半
# 45°旋转图片并缩小一半
M = cv2.getRotationMatrix2D((cols / 2, rows / 2), 45, 0.5)
dst = cv2.warpAffine(img, M, (cols, rows))

cv2.imshow('rotation', dst)
cv2.waitKey(0)
关于仿射和透视请参照这里
二、视频#
2.1 摄像头#
# 打开摄像头
capture = cv2.VideoCapture(0)
- 参数:摄像头的编号
capture相当于创建的VideoCapture对象
# 获取摄像头画面
ret, frame = capture.read()
- 返回值
ret:布尔值,表示当前这一帧是否获取正确 - 返回值
frame:一帧图像
# 获取摄像头的一些属性,比如捕获的分辨率,亮度和对比度等
cap.get(propId)
# 修改属性值
cap.set(propId,value)
propId是0~18的数字,代表不同的属性,完整的属性列表:
CV_CAP_PROP_POS_MSEC: Current position of the video file in milliseconds.CV_CAP_PROP_POS_FRAMES: 0-based index of the frame to be decoded/captured next.CV_CAP_PROP_POS_AVI_RATIO: Relative position of the video file: 0 - start of the film, 1 - end of the film.CV_CAP_PROP_FRAME_WIDTH: Width of the frames in the video stream.CV_CAP_PROP_FRAME_HEIGHT: Height of the frames in the video stream.CV_CAP_PROP_FPS: Frame rate.CV_CAP_PROP_FOURCC: 4-character code of codec.CV_CAP_PROP_FRAME_COUNT: Number of frames in the video file.CV_CAP_PROP_FORMAT: Format of the Mat objects returned by retrieve() .CV_CAP_PROP_MODE: Backend-specific value indicating the current capture mode.CV_CAP_PROP_BRIGHTNESS: Brightness of the image (only for cameras).CV_CAP_PROP_CONTRAST: Contrast of the image (only for cameras).CV_CAP_PROP_SATURATION: Saturation of the image (only for cameras).CV_CAP_PROP_HUE: Hue of the image (only for cameras).CV_CAP_PROP_GAIN: Gain of the image (only for cameras).CV_CAP_PROP_EXPOSURE: Exposure (only for cameras).CV_CAP_PROP_CONVERT_RGB: Boolean flags indicating whether images should be converted to RGB.CV_CAP_PROP_WHITE_BALANCE: Currently unsupportedCV_CAP_PROP_RECTIFICATION: Rectification flag for stereo cameras (note: only supported by DC1394 v 2.x backend cur- rently)
2.2 本地视频#
# 播放本地视频
capture = cv2.VideoCapture('demo_video.mp4')

while(capture.isOpened()):
    ret, frame = capture.read()
    gray = cv2.cvtColor(frame, cv2.COLOR_BGR2GRAY)

    cv2.imshow('frame', gray)
    if cv2.waitKey(30) == ord('q'):
        break
2.3 录制视频#
capture = cv2.VideoCapture(0)

# 定义编码方式并创建VideoWriter对象
fourcc = cv2.VideoWriter_fourcc(*'MJPG')
outfile = cv2.VideoWriter('output.avi', fourcc, 25., (640, 480))

while(capture.isOpened()):
    ret, frame = capture.read()

    if ret:
        outfile.write(frame)  # 写入文件
        cv2.imshow('frame', frame)
        if cv2.waitKey(1) == ord('q'):
            break
    else:
        break
- 创建一个
VideoWriter的对象,需要给它传入四个参数:- 输出的文件名,如’output.avi’
- 编码方式FourCC 码:Video Codecs
- 帧率FPS
- 要保存的分辨率大小
2.4 视频处理#
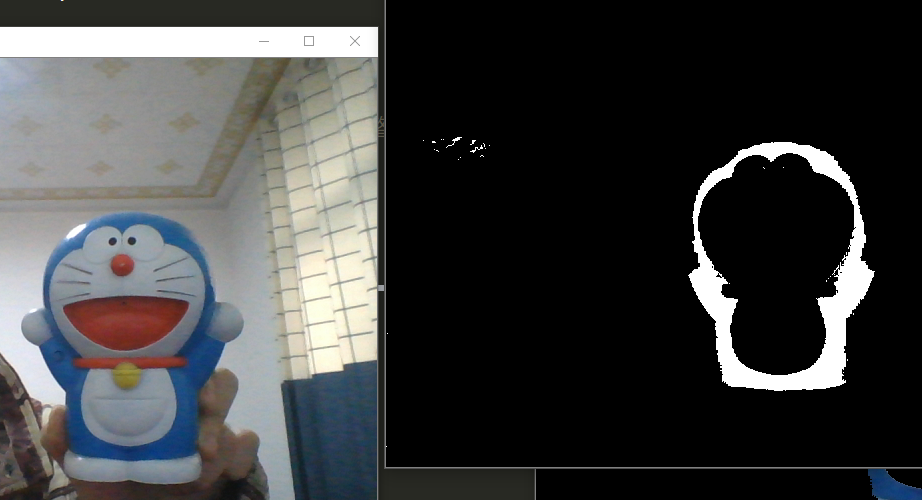
特定颜色物体追踪
HSV是一个常用于颜色识别的模型,相比BGR更易区分颜色,转换模式用COLOR_BGR2HSV表示。
OpenCV中色调H范围为[0,179],饱和度S是[0,255],明度V是[0,255]。虽然H的理论数值是0°~360°,但8位图像像素点的最大值是255,所以OpenCV中除以了2,某些软件可能使用不同的尺度表示,所以同其他软件混用时,记得归一化。
使用HSV来只显示视频中蓝色物体的例子,步骤如下:
- 捕获视频中的一帧
- 从BGR转换到HSV
- 提取蓝色范围的物体
- 只显示蓝色物体
import cv2
import numpy as np

capture = cv2.VideoCapture(0)

# 蓝色的范围,不同光照条件下不一样,可灵活调整
lower_blue = np.array([100, 100, 100])
upper_blue = np.array([130, 255, 255])

while(True):
    # 1.捕获视频中的一帧
    ret, frame = capture.read()

    # 2.从BGR转换到HSV
    hsv = cv2.cvtColor(frame, cv2.COLOR_BGR2HSV)

    # 3.inRange():介于lower/upper之间的为白色,其余黑色
    mask = cv2.inRange(hsv, lower_blue, upper_blue)

    # 4.只保留原图中的蓝色部分
    res = cv2.bitwise_and(frame, frame, mask=mask)

    cv2.imshow('frame', frame)
    cv2.imshow('mask', mask)
    cv2.imshow('res', res)

    if cv2.waitKey(1) == ord('q'):
        break
我房间比较暗,调低了点lower_blue中的饱和度和亮度,哆啦A梦如图:
三、滑动条#
# 创建一个名为test的窗口
cv2.namedWindow('test')
# 创建一个滑动条
cv2.createTrackbar('R', 'test', 0, 255, nothing)
- 参数1:滑动条的名称
- 参数2:所在窗口的名称
- 参数3:当前的值
- 参数4:最大值
- 参数5:回调函数名称,回调函数默认有一个表示当前值的参数
创建好之后,可以在回调函数中获取滑动条的值,也可以用cv2.getTrackbarPos()得到:
r = cv2.getTrackbarPos('R', 'test')
- 参数1是滑动条的名称
- 参数2是窗口的名称。